Edentulous patients who are resigned to using conventional complete dentures may experience many negative issues affecting their overall health and psychological well-being. Methods to improve chewing ability can positively affect the digestive process, providing better nutrition to the patient. Dental implant overdentures have proven to be a viable alternative to conventional dentures and are now able to be a cost-effective treatment modality for many of our patients. Also important is the indication that implants that support an overdenture help preserve residual bone. Patients should be informed that bone loss occurs as teeth are lost, so dentures may need relining or adhesives for proper fit over time. Correctly placed and integrated dental implants may minimize this bone loss. Educating our patients as to the benefits of implant therapy is within the realm of the general dentist, and providing this mode of therapy is both financially and professionally rewarding.
Implant retained overdentures have proven to be a viable treatment option for patients who request improved denture stability and chewing function. The design of these overdentures has evolved over the years. At one time, cast bars with attachments were fabricated. This proved to be an expensive treatment modality and relied on the technical skills of the technician. Casting has been replaced with CBCT and CAD/CAM design protocols, which help establish ideal placement of dental implants and the subsequent prosthesis.1 The most critical aspects of any implant-retained overdenture are proper positioning in the edentulous arch and angulation of the dental implants themselves. Angulation of the posterior implants allows positioning to eliminate lack of support posteriorly bypassing anatomy that may prevent vertical placement, maxillary sinus, and the mental foramen/IAN. Spacing anteriorly-posteriorly will help prevent rocking of the prosthesis during chewing function.
The LOCATOR Attachment System (Zest Dental Solutions, Carlsbad, California) is designed for use with overdentures or partial dentures retained by endosseous implants in the maxilla or mandible. The LOCATOR attachment is designed to fit most implant systems. They have long been recognized for their capabilities in restoring function, esthetics, and quality of life. They currently consist of the lowest vertical height in prosthetic reconstructions, with the attachments being 2.5 mm tall on a non-hexed implant. Utilization on external hex implants requires slightly more height supragingivally. The self-locating design allows the patient to easily seat their overdentures without the need for specific alignment of the attachment components. While dentures may be a cost-effective means to provide esthetics and some semblance of function, many individuals request improvement for ill-fitting conventional dentures. Implant-retained overdentures provide some security and retention, especially in the mandibular arch. The system is dual retention. The combination of inside and outside retention between the attachment components ensures stability over a significant amount of time. The resilient connection for the prostheses consists of a retentive nylon attachment (male) that remains in contact with the abutment while the titanium denture cap holding the male has full range of rotational movement over the male. The LOCATOR Replacement Attachment can be used to restore an implant with up to 10 degrees of divergence or 20 degrees between implants. There is also a LOCATOR Extended Range Replacement Attachment that can accommodate divergent implants between 10 degrees and 20 degrees or 40 degrees total. Increasing the number and spacing of implants within an arch increases stability.2 Patients often inquire about fixed prostheses, but unfortunately the price point is frequently unattainable. According to Zest, cost and simplicity are two important factors in deciding to use the LOCATOR implant retentive system to provide denture stability to patients.
The requirements for LOCATOR supported implant retained overdentures are relatively straightforward. At least four implants spaced for proper cross-arch stabilization are mandated. The implants must have a minimum of 35 N·cm or full osseointegration prior to loading. Angled corrections up to 20 degrees per implant in any direction are possible with stock LOCATOR abutments. Corrections of an additional 15 degrees can now be made with LOCATOR Angled Abutments. Figure 1 and Figure 2 illustrate stock fixed and removable LOCATOR abutments, and Figure 3 and Figure 4 illustrate angled fixed and removable LOCATOR abutments. Cantilevers should be no more than 1.5 times the anterior-posterior (AP) spread. Finally, for patients who are bruxers and/or clenchers, there should be no more than a 1.5 AP spread.3
When treatment planning and designing the prosthesis, proper selection of the cuff size is imperative. The prosthesis should sit above the tissue for maintenance purposes. Depending on the choice of restorative materials, additional vertical clearance may be required.4 A LOCATOR attachment allows for a fixed treatment approach is an option requiring 9 mm to 11 mm of prosthetic space rather than the required 12 mm to 15 mm for more conventional screw-retained implant prostheses.5
To select the proper LOCATOR abutment, the implant type and diameter is determined. Tissue thickness from the apical rim of the implant body to the crest of the gingiva at the highest side of the implant site is measured. The corresponding abutment tissue cuff height is chosen that is exactly equal to the tissue measurement, or the next closest higher size available. The exact tissue cuff height of the LOCATOR abutment will position the proper 1.5 mm of working attachment above the surrounding gingival level. The LOCATOR abutments can be pre-determined through the diagnosis process, healing abutment can be placed at the time of surgery if torque of at least 25 N·cm is achieved, or if minimal torque is not achieved due to hard tissue quality, the implants are buried with cover screws threaded into place.4 After the secondary gingival healing is complete, the LOCATOR abutments are torqued to 30 N·cm. Checking that the abutments are completely seated and not impinged by bone is done radiographically. An abutment driver engages the internal aspect of the abutments for easy seating. The final LOCATOR nylon male retention liner is chosen: clear, 5 lb; pink, 3 lb; and blue, 1.5 lb. If divergence is a challenge the Extended Range Replacement Attachments can be used: green, 4 lb; orange, 2 lb; and red, 1 lb. Figure 5 and Figure 6 illustrate the various retention colors in the LOCATOR system. The correct retention is determined by the manual dexterity of the patient and should be practiced prior to releasing the patient.
Chairside processing of the final LOCATOR abutment is the most accurate means of obtaining retention and stability.5 It will also ensure proper wearing of the attachments over time. The fabricated denture has channels created that allow space for the abutment and denture cap processing attachment assembly. Block out the abutment with white spacers. It is suggested to use as many spacers as necessary to prevent any potential locking of the acrylic intraorally during the process of picking up the attachments in the denture. Make sure occlusion is established and there is no rocking for the prosthesis. Self-curing acrylic is placed into the recess of the denture and the denture seated guiding the patient into occlusion. The denture is maintained passively without compression of the soft tissue while the acrylic sets. The denture, following setting of the resin, is removed intraorally and any flash polished. Voids are filled with a light-cure resin. A LOCATOR seating tool is used to remove and set the nylon attachments.
Proper oral hygiene is important to long-term success of the nylon attachments. The abutments are cleaned to prevent any plaque buildup in the socket of the abutment. A soft nylon brush or end-tufted brush works well. A non-abrasive gel toothpaste and irrigation can be used effectively.
LOCATOR attachments are long lasting, with about 60,000 cycles of use. The patient is advised to have the implants and prostheses checked periodically, with the male attachments changed out approximately once per year.
Precise fabrication of full-arch implant prostheses requires careful planning and proper diagnosing and treatment planning to meet patients’ expectations and provide long-term function and esthetics. Complexities exist in both the maxillary and mandibular arches that may inhibit the practitioner’s ability to provide an optimal restorative solution. Anatomic restrictions include inadequate height or width of available hard tissue, large fallen maxillary sinuses in the posterior, and the mandibular canal and nerve in the mandible such as prominent lingual concavities. The patient’s expectations are determined through careful and thorough communication and discussion. Interocclusal distance, final tooth position, occlusal harmony, and proper facial support are determined virtually through digital processes. Intraoral scanning, CBCT analysis, photography, and even facial scanning help ensure an acceptable result.
Case Report
A 39-year-old male patient with no significant healing concerns presented. The patient is a recreational drug user, experiences sinusitis, and reports smoking half a pack of cigarettes for the past 15 years. He presents with periodontal and restorative concerns with frequent discomfort and infected sites and significant breakdown of the remaining dentition. A CBCT and intraoral examination reveals nonrestorative dentition. After discussion it was decided to remove his remaining dentition and place dental implants in the mandible to support a removable LOCATOR attached overdenture and a conventional maxillary complete denture initially. This case required careful planning with CBCT analysis and fabrication of a surgical reduction guide, implant surgical guide and fabrication of an immediate maxillary complete denture and mandibular overdenture. All procedures were completed without actual wax try-ins, saving chair time.
Four Implant One 300 Series implants (Implant Logistics, Sparta, Wisconsin) were strategically positioned in the positions of tooth Nos. 21, 23, 26, and 28, per virtual design and plan, following extraction of the mandibular teeth. The implants torqued to 35 N·cm, and 3mm tall healing abutments were placed and the mandibular overdenture with prepared relief channels seated. Three months of integration was allowed, and the patient was asked to evaluate the esthetics of the prostheses immediately seated at the time of surgery. Vicryl sutures were used to reposition attached gingiva around the healing abutments and were removed in seven days. The patient and his family were satisfied with the increase in overall health, immediate function, and esthetics. LOCATOR abutments were chosen and seated to place, and the LOCATOR attachments processed chairside to finish the mandibular stability and retention of the mandibular appliance.6
The maxillary arch will eventually be restored with a LOCATOR attached overdenture when financially possible. The proprietary process to fabricate the denture and overdenture from AvaDent dental lab (Scottsdale, Arizona) are CAD/CAM designed, robotically milled for precision and strength. The material is promoted to be 50 times stronger than conventional denture fabrication with no porosities. Esthetics are enhanced digitally as arch form and tooth position can be virtually manipulated to idealize tooth position over the pre-determined ridge form. A permanent digital record is maintained for any future use.
Clinical steps are described here. Cone-beam analysis determines the restorability of remaining dentition and available hard tissue for implant placement and overdenture function. Figure 7 and Figure 8 illustrate pre-operative CBCT analysis of available hard tissue for ideal implant placement. Following a proprietary design process, a bone reduction guide and implant surgical guide will be fabricated maximizing strength and improving esthetics. Health issues and medication use as well as manual dexterity complications are investigated thoroughly. Health and well-being are evaluated for initial reconstruction and long-term viability. Healing concerns are determined. Six pre-operative photographs taken using an iPhone 17 help the dental laboratory digitally design tooth contour, midline, and plane of occlusion prior to any surgical intervention (Figure 9 through Figure 14). Figure 15 and Figure 16 show the occlusal views of the poor prognosis of the remaining dentition and arch form to be duplicated in the final prostheses.
Digital or analogue impressions are made of the pre-existing dental condition. This includes bite relationships, midline, incisal edge considerations, ala-tragus plane, smile line and jaw relation issues, phonetic concerns, a proper shade selection, the mold of the existing teeth, and patient’s desires. Figure 17 illustrates how analogue impressions are scanned using a Medit T710 lab scanner. This along with the digital photos prepare the foundation for implant placement and prosthetics.
Surgical and prosthetic consents are reviewed and documented. Analog records are digitized using the Medit scanner. The information is exported to AvaDent Lab. Prosthetic design and treatment are planned out prior to any surgical intervention. A team approach on design is done and evaluated carefully prior to acceptance. The implants are virtually positioned to allow for an 8 mm abutment and housing zone from the intaglio surface to the final denture to the coronal portion of the implants while maintaining a 2 mm safe zone from the implant to any vital anatomy. Figure 18 through Figure 20 show how the arch form is evaluated and manipulated to achieve the desired esthetics and tooth position. Communication between the practitioner and laboratory technician is critical to functional and esthetic success. Tooth mold, position, midline are all pre-determined prior to processing (Figure 21). The final restoration will have at least 3 mm of thickness to keep the acrylic strength in function.
Prosthetics is the primary concern in these overdenture reconstructions. Once finalized by the practitioner and often the patient, surgical guides are designed and fabricated. A simple reduction guide is first created to ensure enough interocclusal space to maintain the final prosthesis properly. The implant guide is used to maximize implant position in the viable bone (Figure 22 and Figure 23). Spacing is determined and idealized depending on the available hard tissue. A full thickness flap is initially made from first molar to first molar. Fixation pins are used to stabilize the reduction guide. Removing of the remaining teeth is done as atraumatically as possible to the surrounding bone. The bone reduction guide is removed and replaced with the implant surgical placement guide. Figure 24 and Figure 25 illustrate the technique to minimize trauma to the facial plate of bone, the teeth were horizontally sectioned to reduce the center of rotation for extraction. Full tissue reflection is made to provide easy access for extractions. Figure 26 shows how the reduction guide is secured with stabilizing pins and the diseased hard tissue contoured. The implant surgical guide is positioned passively and stabilized allowing for implant placement (Figure 27).
Implants are threaded to place to achieve at least 35 N·cm if possible, and 3 mm tall healing abutments are threaded to place and all positioning verified with CBCT analysis (Figure 28 and Figure 29). Tissue repositioning is done with Vicryl (PGA) (Newport Biologics, Irvine, California) sutures, making sure there is a band of attached gingiva on the facial aspect of each healing abutment. Sutures are removed in 7 to 10 days, and the implants allowed to integrate for 3 months in the mandibular arch. Following this three months of integration, the implants are loaded with LOCATOR abutments, and the mandibular implant retained prosthesis attachments are processed chairside (Figure 30 and Figure 31).
The prefabricated denture is seated using a soft liner. Patients are responsive to this treatment, as all follow-up is routine. The result is all that matters here, so integration is monitored throughout the process. Final loading using the LOCATOR attachments is complete chairside after the three-month healing time (Figure 32 and Figure 33).
The patient expressed high satisfaction with the mandibular overdenture; however, replacement of the conventional denture with a LOCATOR overdenture has been deferred because of financial constraints.
Proper diagnosis and planning are completed with the dental laboratory to insure proper angulation and positioning of the dental implants in the available bone. Careful considerations are made to the health of the patient and healing properties, medication use, dental hygiene protocols amount of available hard tissue to meet the patient’s expectations and functional and esthetic desires.2 Communication with the patient as to financial restraints, overall health, and bone contour is paramount to the success of these cases. Many patients present with the desire to remove all unesthetic or diseased teeth with the hope of finally resolving long-term discomfort and concerns and never seeing a dentist again. It is important that the patient become part of the design process, so there is no miscommunication as to what the results will entail and how they will function over time. Management for years must be explained and become a part of the entire dental implant process.
The use of digital dentistry promotes a predictable surgical result which maximizes the final prosthetic procedures and patient esthetics and function. These implants are both implant- and tissue-supported, are easy for the patient to maintain, and yet provide stability and retention at a fair and reasonable cost to the patient.7 If any clinical problems arise over time, as health and medication use changes as the patient ages, they are easily overcome without having to start over with expensive chairside and laboratory costs.
The quality of life created by creating a prosthesis that increases chewing efficiency and eliminates the need for any denture adhesive is remarkable.
In conclusion, implant-retained overdentures have proven to be a cost-effective, excellent treatment choice for many of our edentulous patients. Two to four implants are strategically placed to provide stability of a denture and create retention. They are easy to maintain, and the dentures can be removed by the patient for easy cleaning. Patients’ main complaint with standard dentures is stability and retention. LOCATOR overdentures provide a stable prosthesis overcoming those patient issues. Function and chewing ability are significantly improved and the patient’s quality of life is elevated. LOCATOR attached overdentures are a cost effective and relatively simple retentive device. If retention needs to be improved, the nylon inserts are easy to change. Not all patients require, request, or are financially able to afford the most popular fixed implant retained bridges. However, the implant retained prosthesis appears to be an ideal improvement over conventional denture.
A complete list of references is available in the online version of this article, available at
www.insidedentistry.net/go/kosinski0426
References
1. Cost analysis: traditional bar overdentures vs. LOCATOR FIXED® solutions. Zest Dental Solutions Blog. https://www.zestdent.com/blog/cost-analysis-traditional-bar-overdentures-vs-locator-fixed-solutions. Published November 7, 2024. Accessed December 22, 2025.
2. Duong HY, Roccuzzo A, Stähli A, et al. Oral health-related quality of life of patients rehabilitated with fixed and removable implant-supported dental prostheses. Periodontol 2000. 2022;88(1):201-237.
3. Messias A, Karasan D, Nicolau P, et al. Rehabilitation of full-arch edentulism with fixed or removable dentures retained by root-form dental implants: a systematic review of outcomes and outcome measures used in clinical research in the last 10 years. Clin Oral Implants Res. 2023;34 suppl 25:38-54.
4. Delucchi F, De Giovanni E, Pesce P, et al. Framework materials for full-arch implant-supported rehabilitations: a systematic review of clinical studies. Materials (Basel). 2021;14(12):3251.
5. Carpentieri J, Greenstein G, Cavallaro J. Hierarchy of restorative space required for different types of dental implant prostheses. J Am Dent Assoc. 2019;150(8):695-706.
6. Scherer MD. When to use laboratory vs. chairside processing of overdentures. Inside Dental Technology. 2021;12(5):16-23.
7. Kutkut A, Bertoli E, Frazer R, et al. A systematic review of studies comparing conventional complete denture and implant retained overdenture. J Prosthodont Res. 2018;62(1):1-9.
Figures and Images

Figure 1

Figure 2

Figure 3

Figure 4

Figure 5

Figure 6

Figure 7

Figure 8

Figure 9

Figure 10

Figure 11
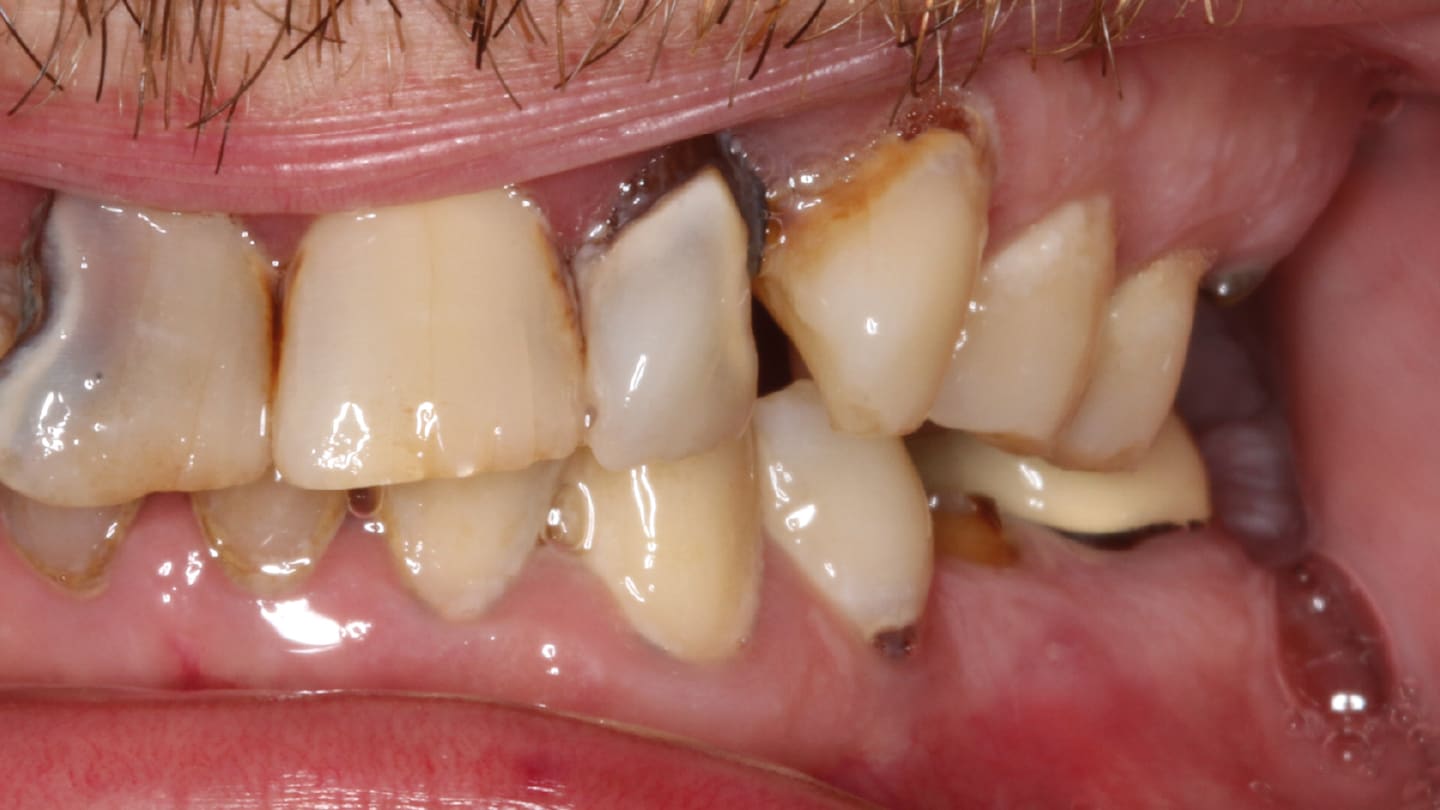
Figure 12

Figure 13

Figure 14

Figure 15

Figure 16

Figure 17

Figure 18

Figure 19

Figure 20

Figure 21
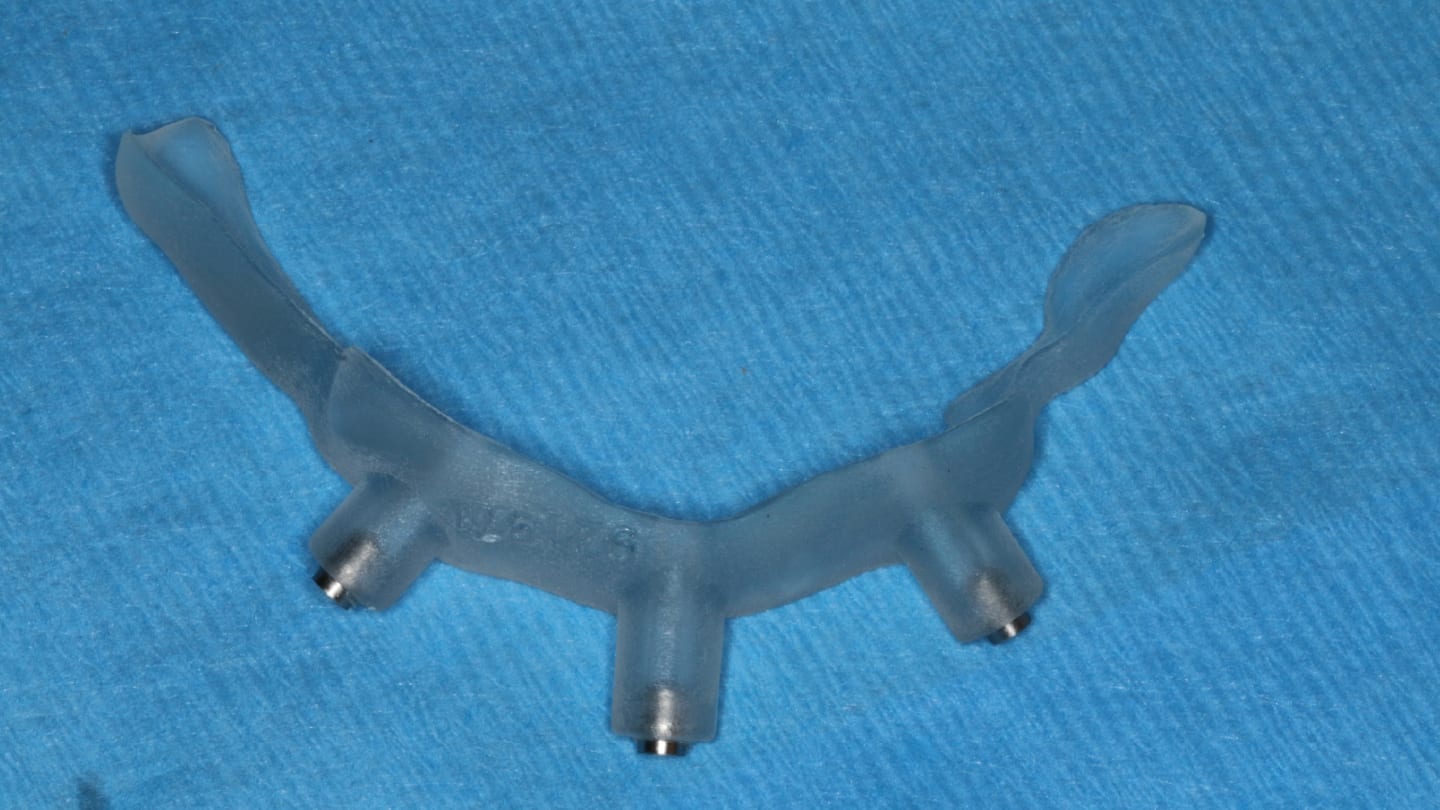
Figure 22
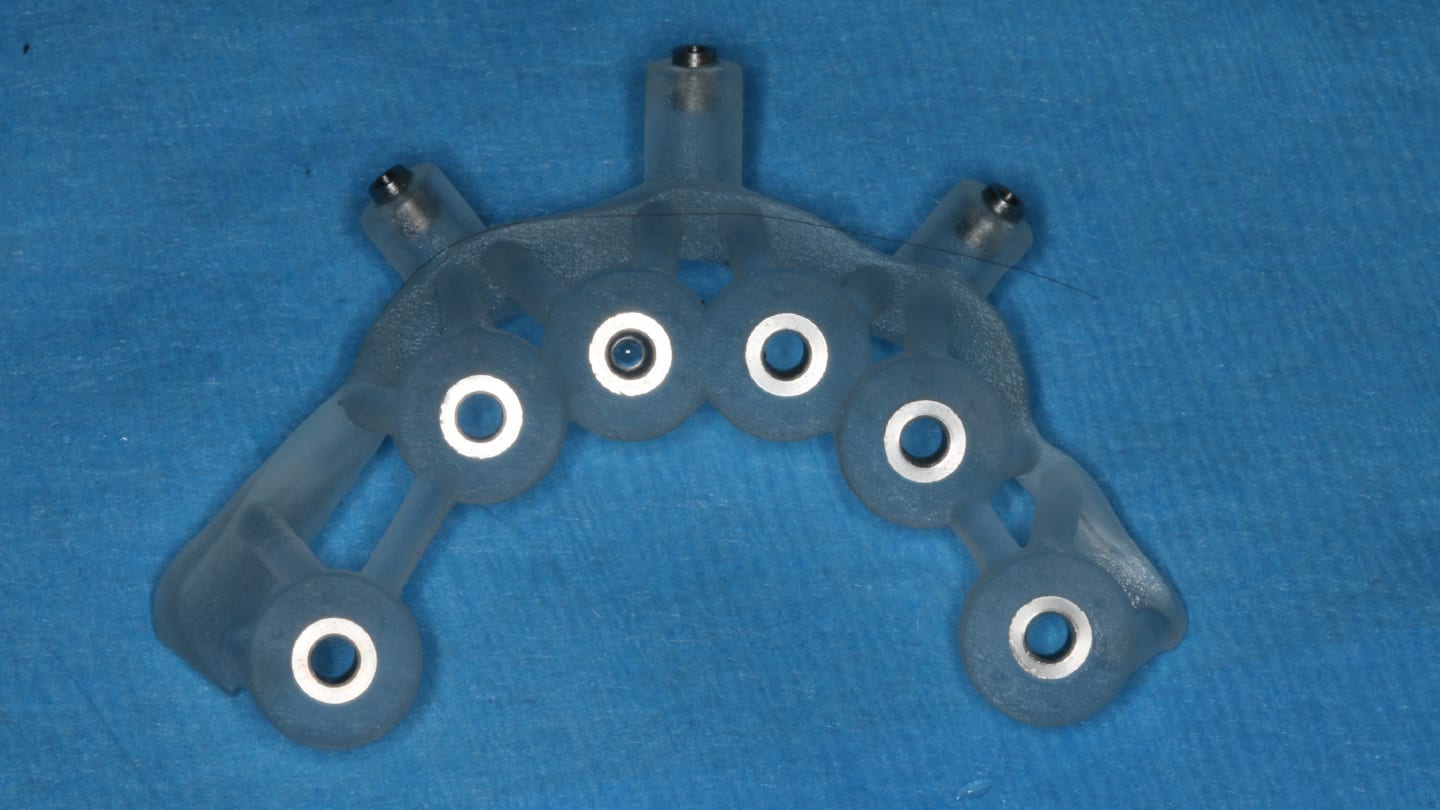
Figure 23

Figure 24

Figure 25

Figure 26

Figure 27

Figure 28

Figure 29

Figure 30
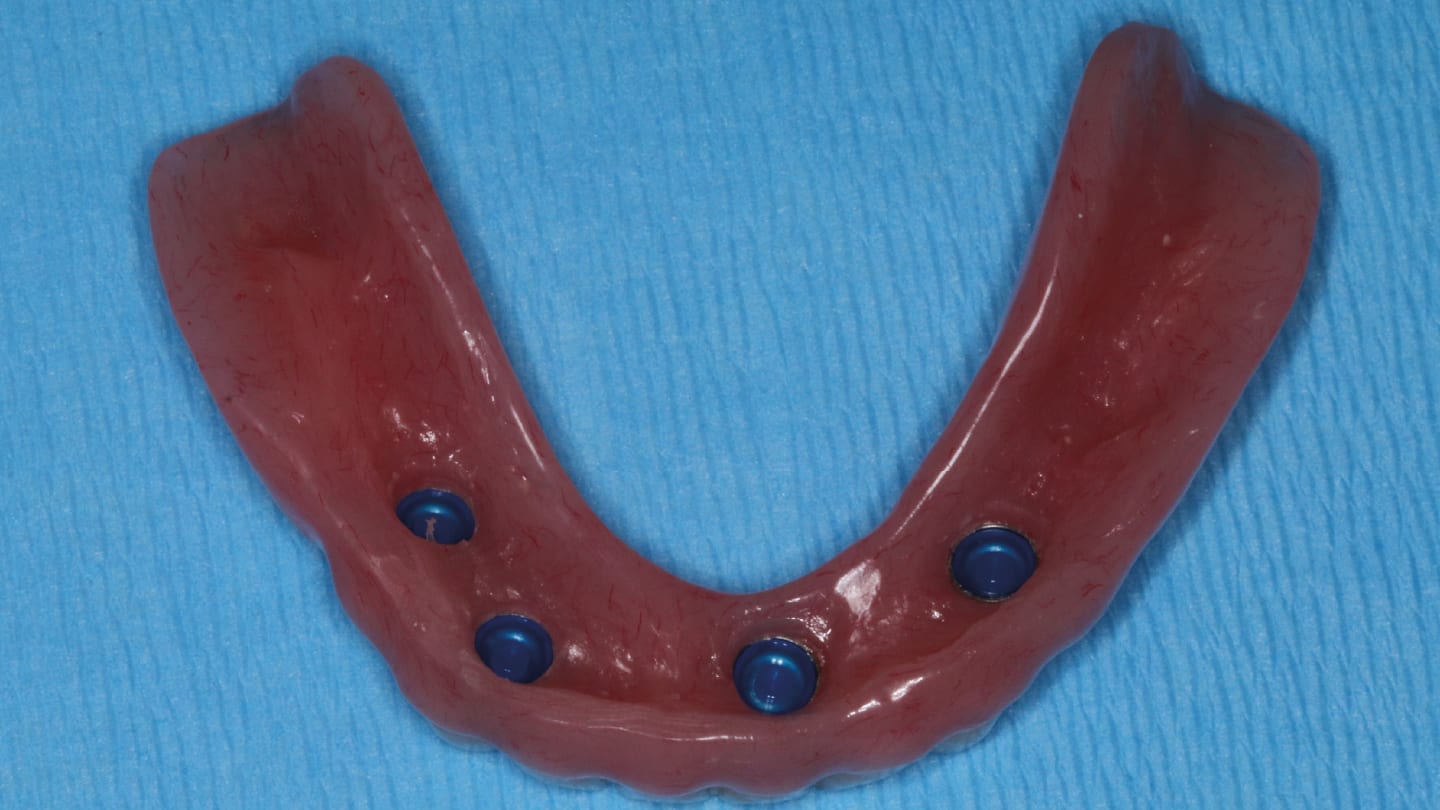
Figure 31
Figure 32

Figure 33

TIMOTHY KOSINSKI, DDS

STEPHANIE TILLEY, DMD
